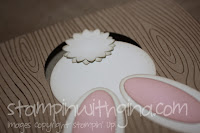
 I wanted to share this super cute card with you. Thanks for my friend Cindy Russell for showing us how to do this. I know it's way past Easter, but this is so adorable I just had to share this project. We made this at an Ink Inc Shoebox Swap. The Shoebox Swap is one of the perks we enjoy as a demonstrator where we all get together for fun, sharing and of course, stamping. Want to know more? Just ask me.
Back to the bunny. This card was made with a multitude of punches (including one that has retired). The background was made with the Woodgrain background stamp (117100 - $17.95) with Soft Suede ink (115657 - $5.95) on a half sheet of Crumb Cake cardstock ((120953 - $$6.95). Punch out a rabbit hole using the 1-3/4" punch (119850 - $16.95). Also punch out circle in Whisper White Cardstock (100730 - $8.50), four large ovals (119859 - $15.95), one ornament punch (119847 - $16.95), two 3/4" circles (119873 - 10.95) and three large flowers from the Boho Blossoms punch (119858 - $16.95). You will also need four small oval pieces punched out (this is the retired punch) and a small triangle cut from Pretty in Pink cardstock (100459 - $6.95), and some small circles from the cupcake builder punch (121807 - $16.95). i know that sounds like a lot of punches, and if you don't have them all, right now you are in luck because a lot of them that are in the old style are on clearance. You can go here to order them, but do it soon because when they are gone, they are gone.
Okay, back to the bunny. On the ornament punch cut off the hangy deal (I know, technical right) part of paper to create the bunny head. Sponge all the edges of the white and pink punched pieces to give them a little dimension. Position the white circle about 3/4 of the way up on the "rabbit hole" on the crumbcake piece, and adhere. Add two large ovals for the feet, and then two pink pieces to finish the feet. Add two of the flowers, layering offset to create the cottontail. If desired, use the Pretty in Pink marker to add lines to the feet. You are now done with the outside of the card.
Open the card to the inside and adhere the remaining flower for the other side of the cottontail. Add the remaining large white ovals and smaller pink ovals for the ears, then layer the ornament punch (pointy side up) for the head. Add the two 3/4 inch circles for the cheeks, to small dots from the cupcake punch (or you can just color them in) in black for the eyes, and a small scrap triangle of pink for the nose.
Draw the whiskers in with the black marker. Tada! You have a super cute bunny to send to that special someone.
Don't forget, card class is this Wednesday. Come and make some great cards for $20. Please let me know if you plan to attend so I can have your packet ready.
Happy Stampin'!
Gina


No comments:
Post a Comment
Please leave your thoughts, but keep it positive. :0)